The Agents module.
The Agents module is used for the central management of agents used in OP5 Log Analytics such as Filebeat, Winlogbeat, Packetbeat, Metricbeat.# Agent installation # All necessary components can be found in the installation folder ${installation_folder}/utils/agents_bin.
Component modules
The software consists of two modules:
- Plugin Agents - installation just like any standard Kibana plugin. Before you run the module for the first time, you must add the mapping for the .agents index with the
create_temlate.shscript - MasterAgent software - installed on host with agent (like beats);
Table of configuration parameter for Agent software
	|Parameter            |Work type             |Required |Defult value           |Description                                 |
	|---------------------|----------------------|---------|-----------------------|--------------------------------------------|
	|port                 |Agent                 |No       |40000                  |The port on which |the agent is listening   |
	|host                 |Agent                 |No       |Read from system       |The address on which the agent is listening |
	|hostname             |Agent                 |No       |Read from system       |Host name (hostname)                        |
	|autoregister         |Agent                 |No       |24                     |How often the agent's self-registration should take place. Time in hours |
	|metricbeat_path      |Agent                 |No       |./                     |Catalog for meatricbeat                     |
	|filebeat_path        |Agent                 |No       |./                     |Directory for filebeat                      |
	|winlogbeat_path      |Agent                 |No       |./                     |Catalog for winlogbeat                      |
	|packetbeat_path      |Agent                 |No       |./                     |Catalog for packetbeat                      |
	|custom_list          |Agent                 |No       |Not defiend            |List of files and directories to scan. If a directory is specified, files with the yml extension are registered with it. The file / directory separator is the character ";" |
	|createfile_folder    |Agent                 |No       |Not defiend            |List of directories where files can be created. The catalogs are separated by the symbol ";". These directories are not scanned for file registration.
	|logstash             |Agent                 |No       |https://localhost:8080 |Logstash address for agents                  |
	|https_keystore       |Agent and Masteragent |No       |./lig.keystore         |Path to the SSL certificate file.            |
	|https_keystore_pass  |Agent and Masteragent |No       |admin                  |The password for the certificate file        |
	|connection_timeout   |Agent and Masteragent |No       |5                      |Timeout for https calls given in seconds.    |
	|connection_reconnect |Agent and Masteragent |No       |5                      |Time in seconds that the agent should try to connect to the Logstash if error occur |
Installing the agent software
The Agent’s software requires the correct installation of a Java Runtime Environment. The software has been tested on Oracle Java 8. It is recommended to run the Agent as a service in a given operating system.
Generating the certificate
The Logshash, Agent and Masteragent use the same certificate file. To generate a file, use the command:
keytool -genkey -alias aka -keypass simulator -keystore lig.keystore -storepass simulator
Logstash configuration
input
  input {
    http {
      ssl => true
      keystore => "/opt/lig.keystore"
      keystore_password => "simulator"
      tags => ["agents"]
    }
  }
output
  output {
    if "agents" in [tags] {
  elasticsearch {
      hosts => "localhost:9200"
      manage_template => false
      index => ".agents"
      document_type => "doc"
    }
    }
  }
Linux host configuration
- Download
MasterBeatAgent.jarandagent.conffiles to any desired location; - Upload a file with certificates generated by the
keytooltool to any desired location; - Update entries in the
agent.conffile (the path to the key file, paths to files and directories to be managed, the Logstash address, etc.); - The agent should always be run with an indication of the working directory in which the
agent.conffile is located; - The Agent is started by the
java -jar MasterBeatAgent.jarcommand.
- Download
Windows host configuration
- Installation in Windows is analogous to installing on a Linux system;
- To install the agent as a service, you can use the wrapper ${installation_folder}/utils/agents_bin/wrapper;
- The sample of
agents.exeandagents.xmlfiles are in the agents_bin/wrapper directory; - As a working directory, set the directory where the agent configuration file is located.
The agent management
The GUI console is used to manage agents. In the Agetns tab, you can find a list of connected agents. There are typical information about agents such as:
- Host name;
- OS name;
- IP Address;
- TCP port;
- Last revision;
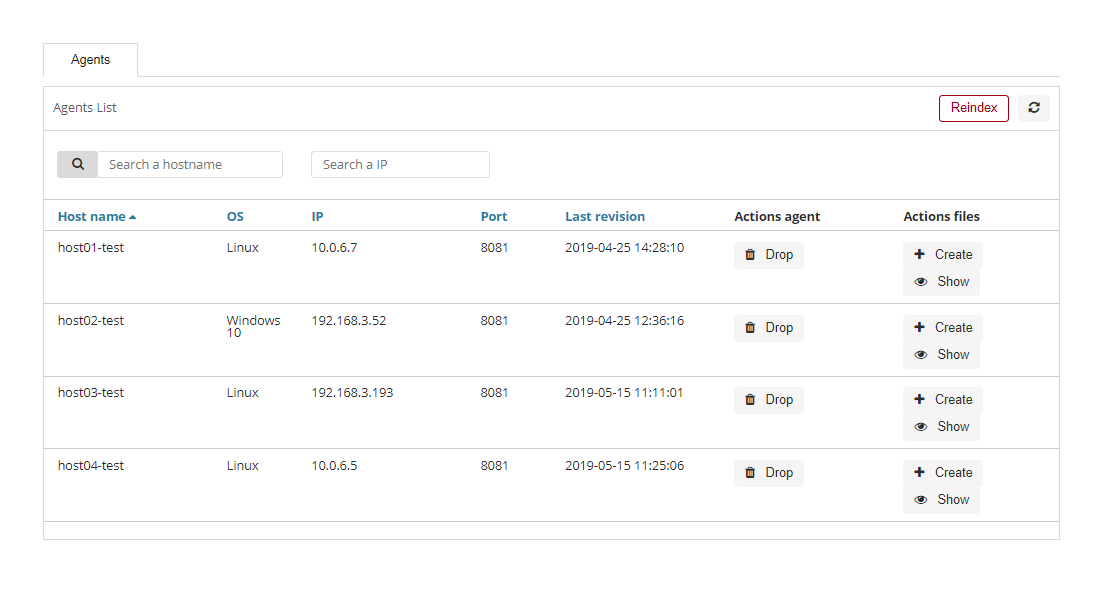
Additionally, for each connected agent, you can find action buttons such as:
- Drop - to remove the agent configuration from the GUI;
- Create - to create new configuration files;
- Show - it is used to display the list of created configuration files;
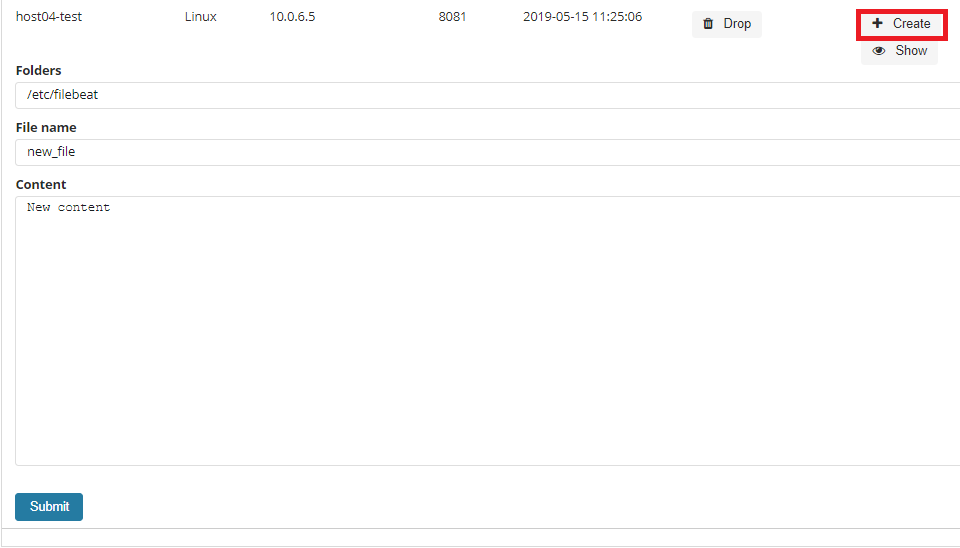
Creating a new configuration file
To add a new configuration file press the Create button, add a new file name, add a new path where the file should be saved and the context of the new configuration file. The new file will be saved with the extension * .yml.
Editing configuration file
To display a list of configuration files available for a given host, press the Show button.
A list of configuration files will be displayed, and the following options for each of them:
- Show - displays the contents of the file;
- Edit - edit the contents of the file;
- Delete - deletes the file.
To edit the file, select the Edit button, then enter the changes in the content window, after finishing select the Submit button.